
|
Skype Our Customer Service
|
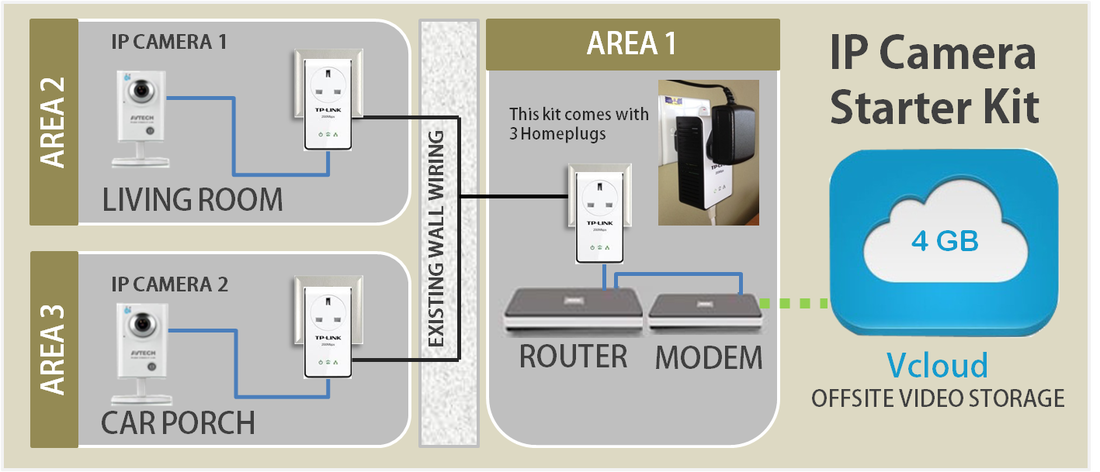
IP CAMERA STARTER KIT INSTALLATION GUIDE
Part 1: Deciding the Camera Locations
Decide where you want to place the cameras. The cameras should be placed 7-8ft from the ground and pointed towards the area you want to monitor. Ask your electrician to pull a power socket to the camera point from the nearest power supply.
Part 2: Pairing the Homeplugs
2.1 Plug the homeplug into a wall socket or a power strip near the modem/router.
2.2 Connect your Homeplug to your modem/router with a short strip of network cable and power on.
2.3 Plug the other homeplugs on the same power strip and power on.
2.4 Press the 'Pair' button on Homeplug 1 for 3 seconds and let go. The 'HOME' LED will start blinking.
2.5 Then press the 'Pair' button on Homeplug 2 for 3 seconds and let go. Homeplug 1& 2 are paired when the
'HOME' LED is steady.
2.6 Now, pair Homeplug 1& 3.
* You must power on the Homeplug at the modem/router first before you power on the other homeplugs.
Part 3: Setting up the Camera
3.1 Bring the Homeplug to your camera point.
3.2 Connect the network cable that comes with the camera to the Homeplug.
3.3 Plug one end of the power adaptor into the camera and the other end to the Homeplug.
3.4 Fix the camera on the wall, and tidy the excess of the cables.
3.5 Power on the Homeplug. The 'DATA' LED will start blinking when the camera is successful connected to the
modem/router.
Part 4: Mobile Surveillance
4.1 Download Eagle Eyes to your iPad, iPhone or Android devices.
4.2 Connect your device to your home WIFI (Local Area Network).
4.3 Press '+' icon on bottom left.
4.4 Scroll down and press 'Local Camera Search'
4.5 Once the search is complete, select the appropriate camera and press 'Apply'.
Part 5: Web Surveillance
5.1 On your web browser, key in the camera IP address with port number 88, for example (192.168.1.5:88)
5.2 Enter your username and password (default is admin, admin). enter the captcha keywords.
5.3 Live view with QuickTime or VLC.
VLC plug-in download link: http://www.videolan.org/vlc/index.html
QuickTime plug-in download link: http://www.apple.com/quicktime/download/
Part 6: Activating Vcloud Offsite Video Storage
Your starter kit includes a 4GB Vcloud storage for 1 month. You will have received your Vcloud username and password when you register with us.
6.1 From your web browser, log in to the camera (192.
6.2 Go to Config>>Advanced>>Trigger and check FTP: External Alarm, Motion, PIR
6.3 Go to 'Config' and then go to 'FTP', enter the following details:
Username is your Vcloud username
Password is your Vcloud password
FTP: ftp.drivehq.com
6.4 A directory is the folder path where your video are kept. If you have your camera installed in the Kitchen
and Porch, you may want to name your directory accordingly, such as
/kitchen
/porch
6.5 By default, your videos will be stored for 7 days. You may log in to your Vcloud account any time to
download the video files before they expire.
